Open topic with navigation
Skorpio Scanner Configuration Guide
This document provides an overview of the final configuration and maintenance of the Skorpio handheld scanner device used in conjunction with AXIS™ Retail Management System software.
Overview
Complete the following procedures to configure a Retailer's Skorpio scanner for use with the AXIS system.
- Connect the Scanner Dock to a Workstation
- Install Mobile Device Software (as needed)
- Configure Mobile Device Software
- Install MyMobiler Remote Software
- Configure the Scanner
- Install AXIS Mobile Software
- Establish a Wireless Connection
- Configure Wireless Adapter Settings
If necessary, refer to Troubleshooting for additional information.
Connect the Scanner Dock to a Workstation
-
Remove the scanner from the dock and keep it out until instructed otherwise.
Note: Do not connect the Micro USB cable to the dock when the scanner is in the cradle.
- Connect then type B end of the USB cable to the dock.
- Connect the other end of the USB cable to the workstation's USB port.
- Connect the power adapter's plug to a secure, grounded power strip.
- If the scanner does not automatically install the Windows Mobile Device Center application, Install Mobile Device Software.
- When the Windows Mobile Device Center application has been installed, Configure Mobile Device Software.
Install Mobile Device Software
Complete the following procedure to download and install the Windows Mobile Device Center application on the AXIS workstation.
-
Determine the workstation's system type (32-bit or 64-bit).
Note: If needed, complete the following to display the system type:
- Press the Windows key (or click the Start button on the Windows taskbar) to display the Start menu.
- Right-click the Computer option to display a menu.
-
Click the Properties option in the menu to display an informational window.
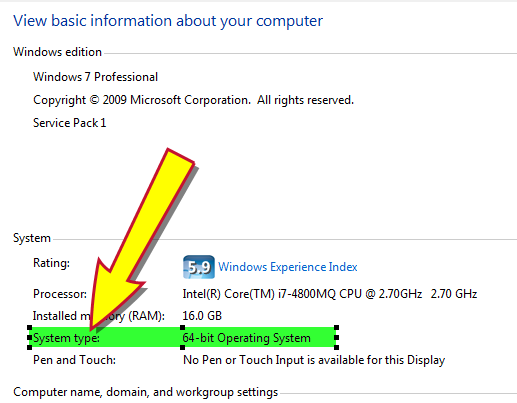
-
The system type is located beside the System type heading.
-
Use the workstation's web browser to access the appropriate application download page:
- Verify that "English" is selected in the Select Language drop-down on the download page.
-
Click the Download button to display a run/save dialog box.

- Click the Run button to start the installation process.
- When the process finishes, Configure Mobile Device Software.
Configure Mobile Device Software
Complete the following procedure to configure the Windows Mobile Device Center application.
- Press the Windows key (or click the Start button) to display the Start menu.
- Click the All Programs option to display a list of all programs.
-
Click the Windows Mobile Device Center option to open the program window.
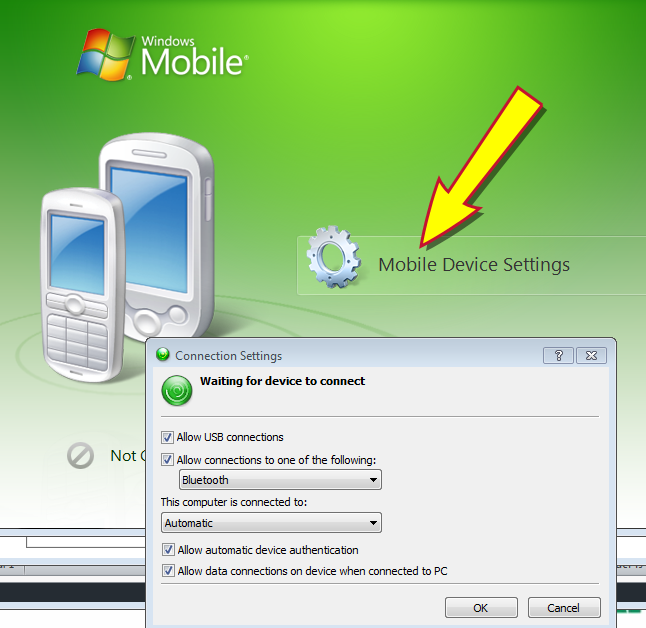
- Click the Mobile Device Settings option to display the Connection Settings window.
- Make sure all checkboxes are checked. (All other controls may be left at default settings.)
- Click the OK button to close the window.
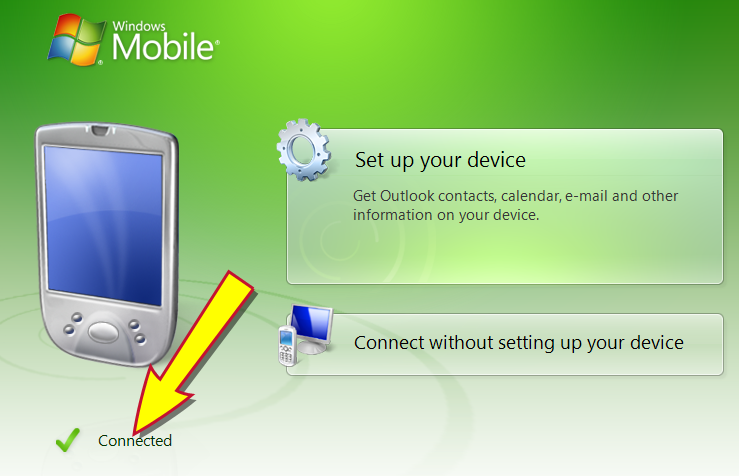
- Place the scanner in the docking station to display a registration prompt.
-
Click the Don’t Register option to close the prompt and display a Connected note on the Windows Mobile Device Centerwindow.
- Next, Install MyMobiler Remote Software.
Install MyMobiler Remote Software
- Contact the Retailer to verify that scanner device has been setup and is in the dock.
- Remote connect (i.e., Bomgar) to the Retailer's workstation connected to the dock.
- Copy the MyMobiler125_02072010 folder from the G drive (G:\Customer_Care\Shared\AXIS Wireless) to the Retailer's workstation.
-
Double-click the MyMoblier123_02072010.exe file on the Retailer's workstation to display a dialog window.
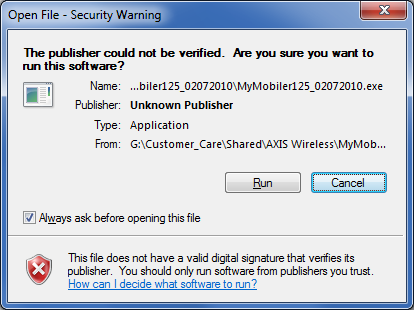
-
Click the Run button to display the MyMobiler v1.25 Setup window.
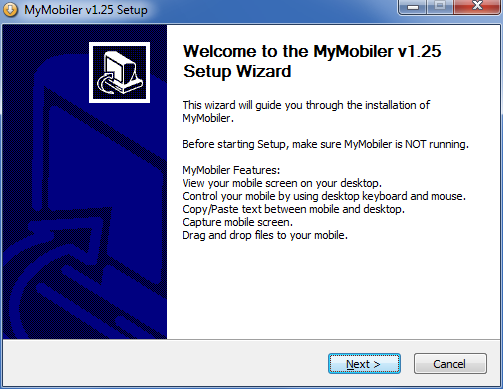
- Click the Next button (or otherwise accepts default settings) on this and each following page in this window to display the MyMobiler folder on the workstation's desktop.
- Copy the MyMobiler icon from the MyMobiler folder to the workstation's desktop.
-
Double-click the MyMobiler icon to launch the program.
Note: Observe the color of the program's icon in the taskbar's notification area. If the icon is blue, the scanner is properly situated in the dock. (If the icon is not blue, the scanner may need to be reset in the dock.)
-
Right-click the program's icon in the taskbar's notification area to display a menu.
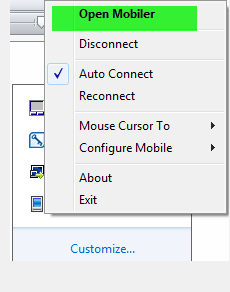
- Click the Open Mobiler option to display the scanner screen on the workstation.
- Next, Configure the Scanner.
Configure the Scanner
Complete the following procedure to configure the scanner.
-
Select Start > Settings > System > Backlight to display the Backlight menu.
Note: A shorthand reference like this indicates the user should 1) click the Start button to display the Start menu, 2.) click the Settings icon to display the Settings menu, 3) click the System icon to display the System menu, and 4) click the Backlight icon to display the Backlight menu.
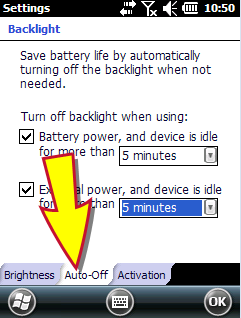
- Click the Auto-Off tab to display it.
- Select "5 minutes" from both drop-downs.
- Click the OK button to save settings.
-
Select Start > Settings > System > Power to display the Power menu.
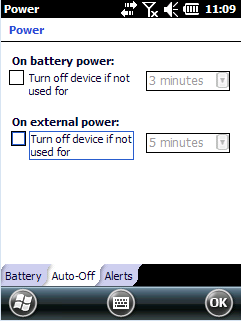
- Click the Auto-Off tab to display it.
- Uncheck both options.
- Click the OK button to save settings.
-
Select Start > Settings > System > Decoding to display the Decoding Properties menu.
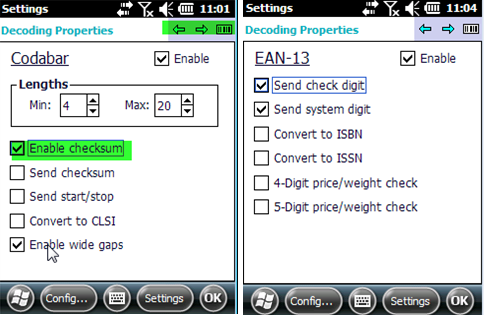
- Click the Config button.
- Select 1D Bar Code and Codabar.
- Verify all settings for Enable Checksum and Send Check Digit are selected.
- Use arrow keys as needed to navigate to all pages.
- Click the OK button to save settings.
Install AXIS Mobile Software
-
Open the Windows Mobile Device Center program.
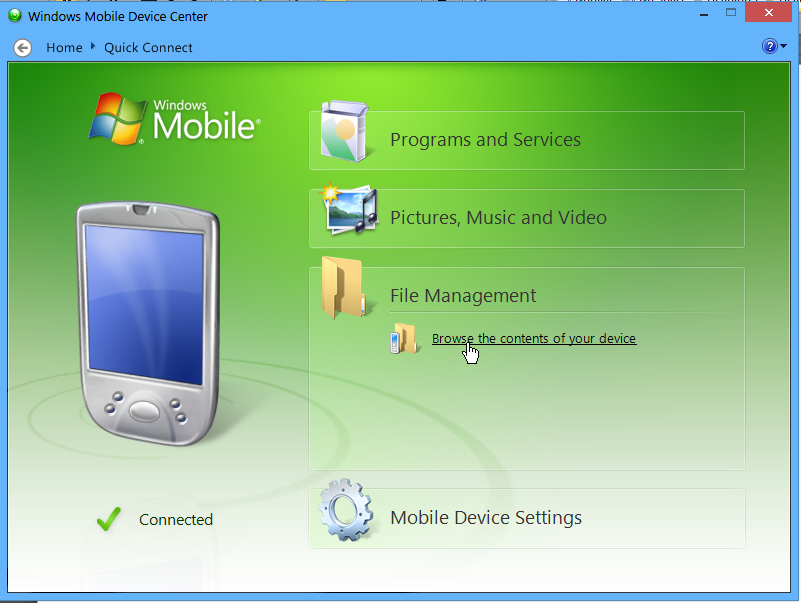
- Click the File Management option to display more options.
- Click the Browse the contents of your device option to display a Windows Explorer window.
- Browse to the Program Files directory and create a new folder called AXISMobile.
- Navigate to G:\Customer_Care\Shared\AXIS Wireless\Axis Mobile Files\Axis Mobile 2.4.
- Copy the Axis Mobile.cab file from this location to the newly created AXISMobile folder.
-
Remove the scanner from the dock to display its onscreen menu.

- Using the stylus, tap the Start button to display the Start menu.
- Tap the File Explorer icon to display the File Explorer window.
- Click the My Device icon to display more options.
- Click the My Device option.
- Browse to the recently created AXISMobile folder in the Program Files directory.
- Click the Axis Mobile.cab file to install it.
- Click the OK button.
- Click the X button.
- Using the stylus, tap the Start button to display the Start menu.
- Scroll down as needed and tap the AXISMobile icon to confirm application install and launch.
- Set up the AXIS Mobile software to point to an internal server to verify it works.
- When the Retailer has received the scanner, Establish a Wireless Connection.
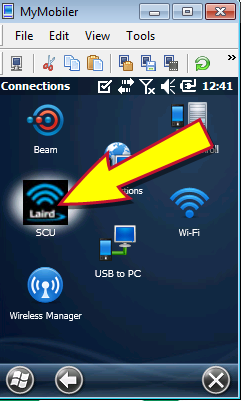
Establish a Wireless Connection
Complete the following procedure to establish a wireless connection between the scanner and the dock.
-
Remove the scanner from the dock to display its onscreen menu.
-
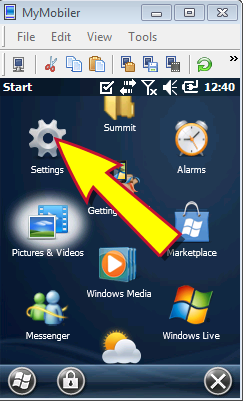
Using the stylus, tap the Start button to display the Start menu.
-
Tap the Settings icon to display the Settings menu.
-
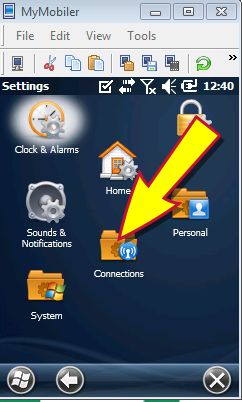
Tap the Connections icon to display the Connections menu.
-
Tap the SCU icon to display the Summit Client Utility menu.
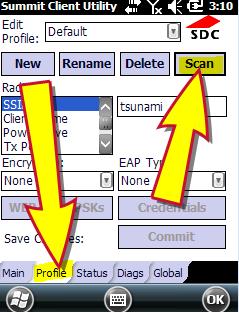
- Tap the Profile tab to display it.
-
Tap the Scan button to display a list of nearby wireless networks.
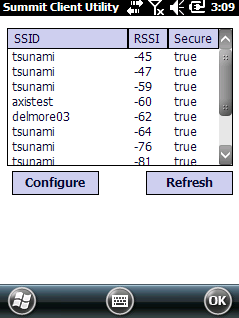
- Select the appropriate wireless network.
-
Click the Configure button to begin the configuration process and display a profile creation prompt.
Note: For best results, the encryption type should be WPA2 TKIP.
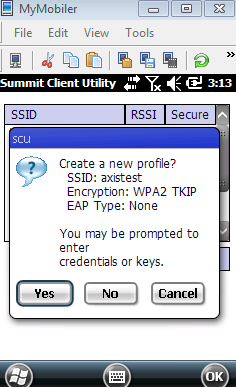
- Click the Yes button to display credential entry fields.
- Enter the appropriate wireless security pass phrase.
- Tap the Commit button to continue the configuration process.
- Tap the Main tab to display it.
-
Select the recently configured wireless network from the Active Profile drop-down.
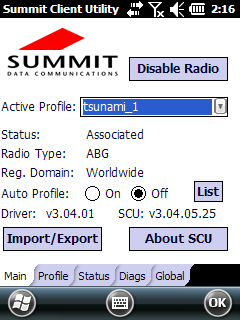
- Confirm that the Status is "Associated" to verify the network connection.
- Click the OK button to close the window.
-
Select Start > Settings > Connections > Wi-Fi to display the Network Adapters window.
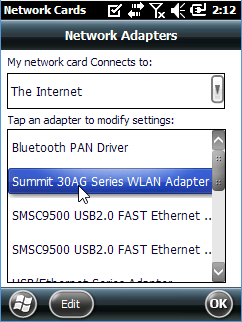
- Select the The Internet option from the drop-down field.
-
Click the Summit 30AG option to display the IP Address section.
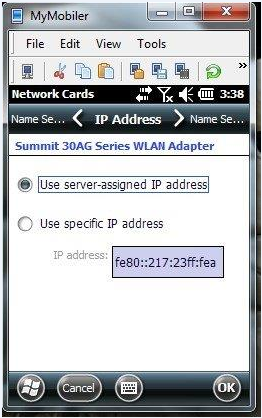
- Click the Use server-assigned IP address option to select it.
- Click the OK button to close the window.
- Click the OK button to close the window.
- Please note the following:
-
Make sure the dock is connected to the workstation. Refer toConnect the Scanner Dock to a Workstation for more information.
-
Make sure the Windows Mobile Device Center application is installed on the Retailer's workstation. Refer to Install Mobile Device Software for more information.
-
If the device displays a screen indicating the connection needs further input to be established, select the The Internet option and click the Connect button.

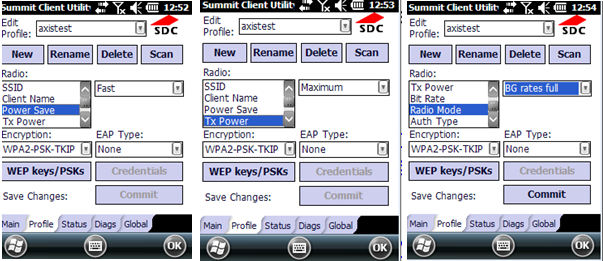
Configure Wireless Adapter Settings
-
Contact the Retailer to verify that scanner device has been configured for wireless communications.
Note: Refer to Establish a Wireless Connection for more information.
-
Remove the scanner from the dock to display its onscreen menu.
-
Using the stylus, select Start > Settings > Connections > SCU to display the Summit Client Utility menu.
-
Tap the Main tab to display it.
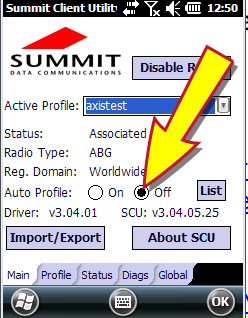
- Click the Off selection button for the Auto Profile setting.
-
Click the Profile tab to display it.
-
Set the Power Save option to "Fast" with the drop-down.
-
Set the TX Power option to "Maximum" with the drop-down.
-
Set the Radio Mode option to "BG rates full" with the drop-down.
-
Click the Commit button to save settings.
-
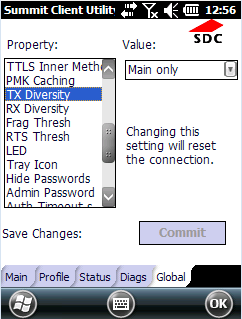
Click the Global tab to display it.
-
Set the TX Diversity option to "Main Only" with the drop-down.
-
Set the RX Diversity option to "Main Only" with the drop-down.
-
Click the Commit button to save settings.
- Click the OK button to close the window.
Troubleshooting
Warm Boot the Scanner
In the event the scanner becomes unresponsive, complete the following procedure to warm boot the scanner.
Note: A warm boot terminates an unresponsive application and clears the working RAM, but preserves the file system. The registry will be restored from persistent memory if available or returned to factory default.
-
Locate the yellow, blue, and ESC buttons on the scanner.

- Press and hold all three keys simultaneously to reboot the scanner and display the home screen.
Clean Boot the Scanner
In the event the scanner cannot be restored with a warm boot, Skorpio Scanner Configuration Guide.
|

|
|
|
© 2016 AcuSport Corporation
All rights reserved
|