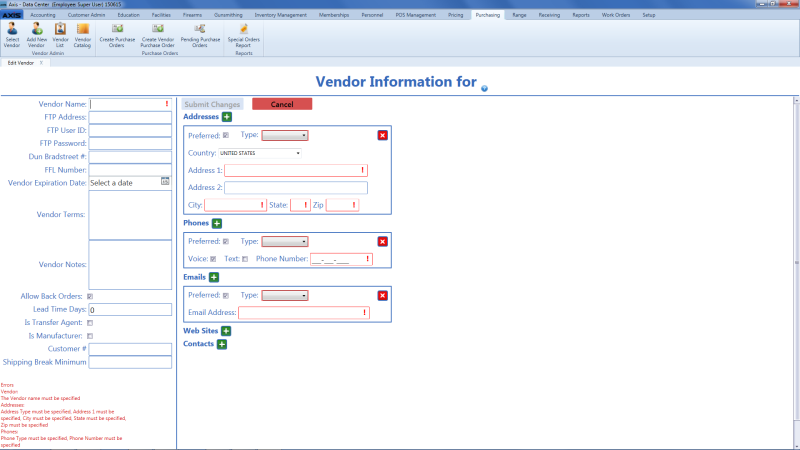
![]() Navigate to a blank Vendor Information for (vendor) screen.
Navigate to a blank Vendor Information for (vendor) screen.
-
Log In to the Data Center Application to display the Data Center Ribbon Menu.
-

Select
 Purchasing > Add New Vendor from the ribbon menu to display the Vendor Information for (vendor) screen.

![]() Enter/edit Vendor information on the screen.
Enter/edit Vendor information on the screen.
Note: Required fields and settings are displayed with red borders.
|
Vendor Name |
Enter the vendor's name. | |
|
FTP Address |
Enter the vendor's FTP address. | |
|
FTP User ID |
Enter the vendor's FTP user name. | |
|
FTP Password |
Enter the vendor's FTP password. | |
|
Dun Bradstreet # |
Enter the vendor's Dun Bradstreet number. | |
|
FFL Number |
Enter the vendor's FFL number. | |
|
Vendor Expiration Date |
Enter the vendor's expiration date (mm/dd/yyyy) or Select a Date with the calendar button. |
|
|
Vendor Terms |
Enter the vendor's terms. | |
|
Vendor Notes |
Enter notes about the vendor. |
|
|
Allow Back Orders |
If the vendor accepts back orders, check the checkbox. | |
|
Lead Time Days |
Enter the number of days needed to process an order before shipping. | |
|
Is Transfer Agent |
If the vendor is a transfer agent, check the checkbox. | |
|
Is Manufacturer |
If the vendor is a manufacturer, check the checkbox. | |
|
Customer # |
Enter the vendor's customer number. | |
|
Shipping Break Minimum |
Enter the vendor's shipping break minimum. | |
|
Addresses |
If an address record is not needed, click its Close (red X) button to close it. |
|
|
Preferred |
If this address record is the preferred method of contact, check the checkbox. |
|
|
Type |
Select the appropriate value from the drop-down menu. |
|
|
Address 1 |
Enter the first line of the street address. |
|
|
Address 2 |
Enter the second line of the street address (if applicable). | |
|
City |
Enter the city. |
|
|
State |
Enter the two-letter abbreviation for the state. |
|
|
Zip |
Enter the ZIP code. |
|
|
Phones |
If a phone record is not needed, click its Close (red X) button to close it. |
|
|
Preferred |
If this phone record is the preferred method of contact, check the checkbox. |
|
|
Type |
Select the appropriate value from the drop-down menu. |
|
|
Voice |
If this phone number can receive voice calls, check the checkbox. |
|
|
Text |
If this phone number can receive text messages, check the checkbox. |
|
|
Phone Number |
Enter the entire (xxx-xxx-xxxx) phone number. |
|
|
Emails |
If an email record is not needed, click its Close (red X) button to close it. |
|
|
Preferred |
If this email record is the preferred method of contact, check the checkbox. |
|
|
Type |
Select the appropriate value from the drop-down menu. |
|
|
Email Address |
Enter the entire email address. |
|
|
Web Sites |
If a website record is not needed, click its Close (red X) button to close it. |
|
|
Preferred |
If this website record is the preferred method of contact, check the checkbox. |
|
|
Type |
Select the appropriate value from the drop-down menu. |
|
|
URL Address |
Enter the website's URL address. |
|
|
Contacts |
If a contact record is not needed, click its Close (red X) button to delete it. To view or edit an existing contact record, click the record's View button to display the contact's Contact Information window. Note: Refer to Manage a Vendor's Contacts for more information. |
|
