Link Inventory Accounts to Departments Link Inventory Accounts to Departments
|
-
Click the Inventory Accounts button to display the Inventory Accounts window.

- Complete these procedures as needed to link QuickBooks Inventory accounts to Departments:
- Link an account to a Department:
- Locate the Department’s drop-down field in the GL Account column.
- Select the corresponding QuickBooks account (or the blank option to clear the field).
- Link an account to multiple departments:
- Check the checkboxes in front of all desired Departments to select them (or click the Select All button to select all Departments).
- Select the corresponding QuickBooks account (or the blank option) from the Set to selected account drop-down field.
- Click the Set button.
- Link an account to unassigned inventory (for items not currently assigned to a department):
- Locate the Unassigned Inventory drop-down field.
Select the corresponding QuickBooks account (or the blank option to clear the field). Note: When an unassigned item is assigned to a Department, it will automatically track to the account linked to that Department.
-
Click the Submit button to save changes and display a confirmation window.
- Click the OK button to close the window.
|
Link Cost of Goods Sold (COGS) Accounts to Departments
|
-
Click the Cogs Accounts button to display the COGS Accounts window.
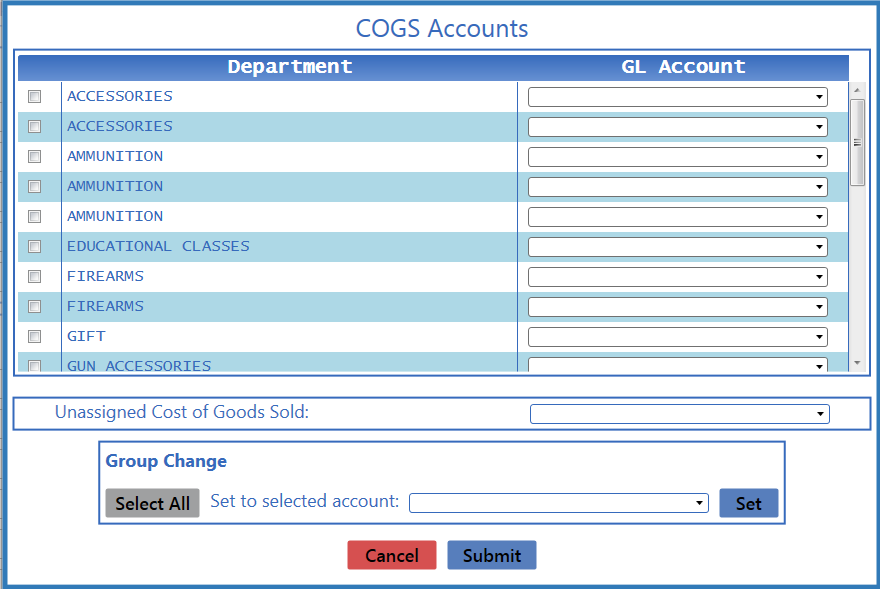
- Complete these procedures as needed to link QuickBooks Cost of Goods Sold accounts to Departments:
- Link an account to a Department:
- Locate the Department’s drop-down field in the GL Account column.
- Select the corresponding QuickBooks account (or the blank option to clear the field).
- Link an account to multiple departments:
- Check the checkboxes in front of all desired Departments to select them (or click the Select All button to select all Departments).
- Select the corresponding QuickBooks account (or the blank option) from the Set to selected account drop-down field.
- Click the Set button.
- Link an account to unassigned cost of goods sold (for items not currently assigned to a department):
- Locate the Unassigned Cost of Goods Sold drop-down field.
Select the corresponding QuickBooks account (or the blank option to clear the field). Note: When an unassigned item is assigned to a Department, it will automatically track to the account linked to that Department.
-
Click the Submit button to save changes and display a confirmation window.
- Click the OK button to close the window.
|
Link Sales Accounts to Departments
|
-
Click the Sales Accounts button to display the Sales Accounts window.
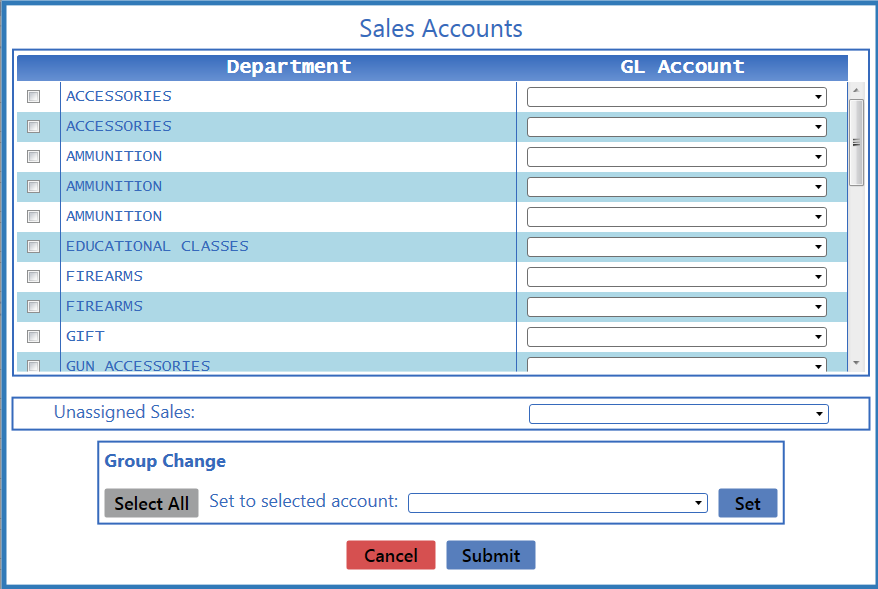
- Complete these procedures as needed to link QuickBooks Sales accounts to Departments:
- Link an account to a Department:
- Locate the Department’s drop-down field in the GL Account column.
- Select the corresponding QuickBooks account (or the blank option to clear the field).
- Link an account to multiple departments:
- Check the checkboxes in front of all desired Departments to select them (or click the Select All button to select all Departments).
- Select the corresponding QuickBooks account (or the blank option) from the Set to selected account drop-down field.
- Click the Set button.
- Link an account to unassigned sales (for items not currently assigned to a department):
- Locate the Unassigned Sales drop-down field.
Select the corresponding QuickBooks account (or the blank option to clear the field). Note: When an unassigned item is assigned to a Department, it will automatically track to the account linked to that Department.
-
Click the Submit button to save changes and display a confirmation window.
- Click the OK button to close the window.
|
Link Vendor Accounts to Vendors
|
-
Click the Vendor List button to display the Vendor Accounts window.
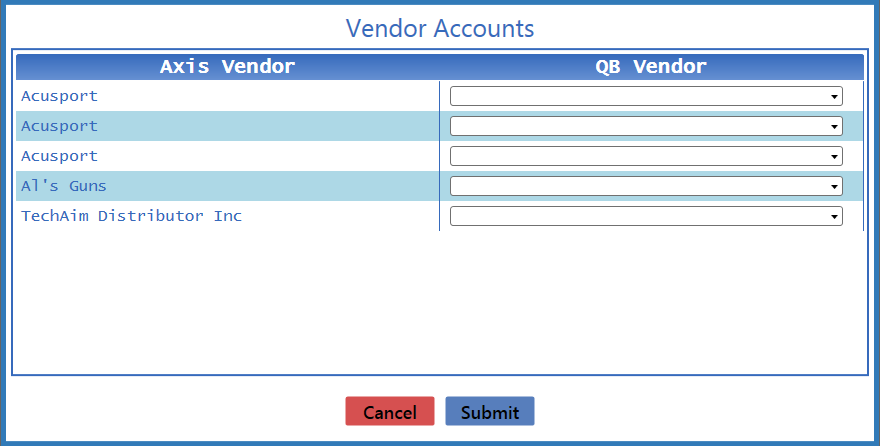
- Complete this procedure for each Vendor in the AXIS Vendor column:
- Locate the Vendor’s drop-down field in the QB Vendor column.
Select the corresponding QuickBooks vendor (or the blank option to clear the field). Note: If no vendors are available in the drop-down, no valid vendors could be located in the QuickBooks program.
-
Click the Submit button to save changes and display a confirmation window.
- Click the OK button to close the window.
|
Link Tax Accounts to Tax Types
|
-
Click the Sales Tax Accounts button to display the Tax Accounts window.
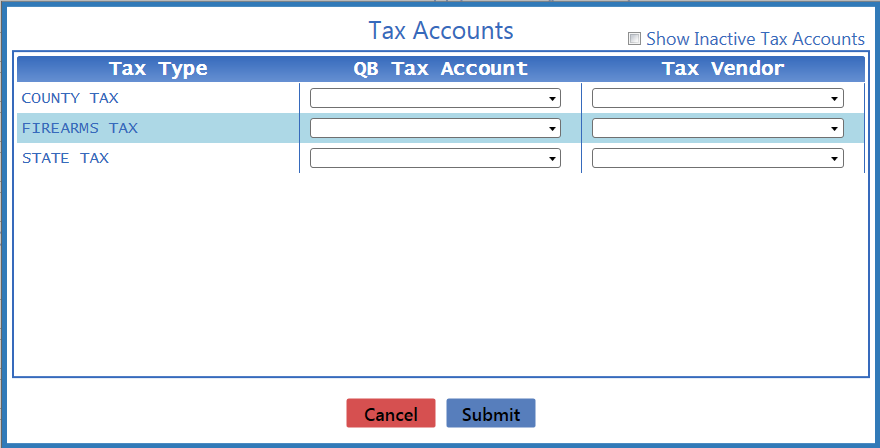
- Complete this procedure for each Tax Type in the Tax Type column:
- Locate the Tax Type’s drop-down field in the QB Tax Account column.
- Select the corresponding QuickBooks tax account (or the blank option to clear the field).
- Locate the Tax Type’s drop-down field in the Tax Vendor column.
- Select the corresponding QuickBooks tax vendor (or the blank option to clear the field).
-
Click the Submit button to save changes and display a confirmation window.
- Click the OK button to close the window.
|
Link a QB Account to the Paid Out Account
|
Select the appropriate QuickBooks account from the Paid Out account’s drop-down field.
|
Link a QB Account to the Adjustment Account
|
Select the appropriate QuickBooks account from the Adjustment Account drop-down field.
|
Link a QB Account to the House Account
|
Select the appropriate QuickBooks account from the House Account drop-down field.
|