|
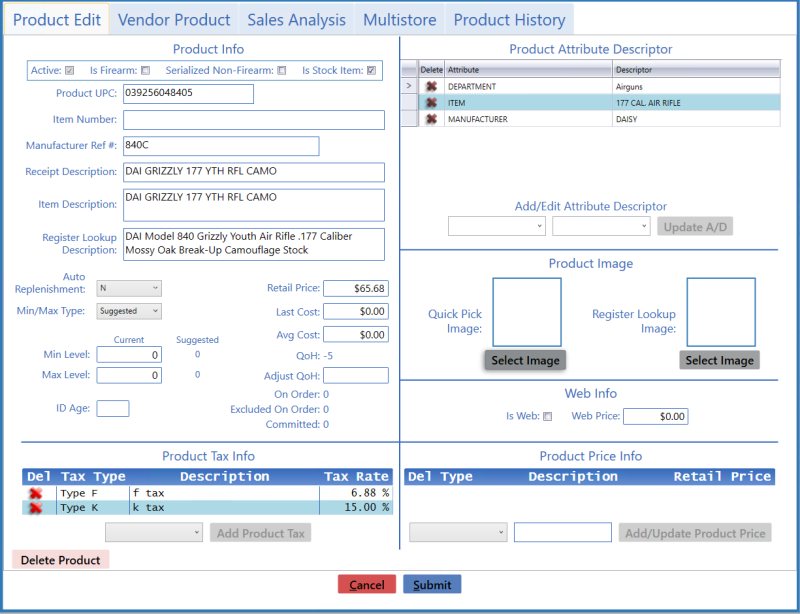
Active
|
Check the checkbox to mark the item as active and make it available for search and selection in the Register application.
|
|
Is Firearm
|
Check the checkbox to mark the item as a firearm.
|
|
Serialized Non-Firearm
|
Check the checkbox to mark the item as a serial non-firearm and require a serial number to receive or sell it.
|
|
Is Stock Item
|
Check the checkbox to mark the item as a physical item that can be inventoried and sold.
|
|
Product UPC
|
Enter the product's UPC code.
|
|
Manufacturer Ref #
|
Enter the manufacturer’s stock number for the item.
|
|
Receipt Description
|
Enter a concise item description (30 characters maximum) to be shown on labels and customer receipts.
|
|
Item Description
|
Enter a lengthy item description (80 characters maximum) to be shown on information screens in the Register application.
Note: If an item has been automatically added to the system by a vendor, a description beginning with "AUTO" displays in this field. Feel free to remove the "AUTO" and modify the description as needed.
|
|
Register Lookup Description
|
This field automatically populates for AcuSport items. The field may be left blank for Non-AcuSport items.
|
|
Auto Replenishment
|
- Select Y (yes) to let the system automatically order the item to maintain inventory levels (as defined by the Min Level and Max Level values).
- Select N (no) to retain standard ordering procedures for this item.
Note: The Auto Replenishment feature is available only to AcuSport Exchange retailers.
|
|
Min/Max Type
|
Select a min/max type (Suggested, Manual, or Automatic) to modify the product's Min/Max Type designation on the Inventory Level screen.
|
|
Current Min Level
|
Enter/edit a value to modify the product's Current Min value on the Inventory Level screen.
If the item's inventory level drops below the minimum, the system can calculate the number of items needed to restock the item to the Max Level value. For example, after a big sale, an item having a Min Level of 3 and a Max Level of 10 has only 2 items remaining in inventory. The system recognizes that inventory is below the minimum level and calculates that 8 (10-2) need to be ordered to bring the item inventory to the maximum level.
Note: If an item's Min Level is set to 0, the Auto Replenishment feature will not order it.
If Auto Replenishment is activated for the item, the system automatically recognizes these shortages and orders items accordingly.
Min/Max calculations are also used to generate suggested ordering quantities when manually creating a vendor-specific purchase order. Refer to Create a Vendor Purchase Order for more information.
|
|
Current Max Level
|
Enter/edit a value to modify the product's Current Max value on the Inventory Level screen.
|
|
Suggested Min Level
|
The field displays the product's Suggested Min value as shown on the Inventory Level screen.
|
|
Suggested Max Level
|
The field displays the product's Suggested Max value as shown on the Inventory Level screen.
|
|
ID Age
|
Enter the minimum age (in years) a customer must be to purchase the product. (If the product has no age requirement, leave the field blank.) Refer to Bulk Edit a Group of Products for information on setting this value for an entire group of products (i.e., firearms, ammunition, etc.).
|
|
Retail Price
|
Enter/edit the standard price for the item as needed.
Note: If no price is entered, the item will ring up for $0.00 in the Register application.
|
|
Last Cost
|
Edit the last cost for the item as needed.
Note: If the item is a firearm, this field may not be edited.
|
|
Avg Cost
|
Edit the average cost for the item as needed.
Note: If the item is a firearm, this field may not be edited.
|
|
QoH
|
The field displays the product's quantity on hand.
|
|
Adjust QoH
|
Edit the quantity on hand for the item as needed.
Note: The Adjust QoH field should not be used with firearms or serialized nonfirearm items.
Note: If an item's QoH is a negative number, the Auto Replenishment feature will not order it.
|
|
On Order
|
The field displays the quantity of the product that is on order.
|
|
Excluded On Order
|
The field displays the quantity of the product that is on order but is not included in QoH calculations.
|
|
Committed
|
The field displays the quantity of the product that has been committed for use outside of inventory (i.e., reserved for a customer, designated a rental item, etc.).
|