- Customer selects a firearm.
Trans type?
- layaway - Place a Product on Layaway
- special order - Place a Special Order
Place a Product on Layaway
- Identify the Customer.
- Click the Sell tab to display the Sell window.
-
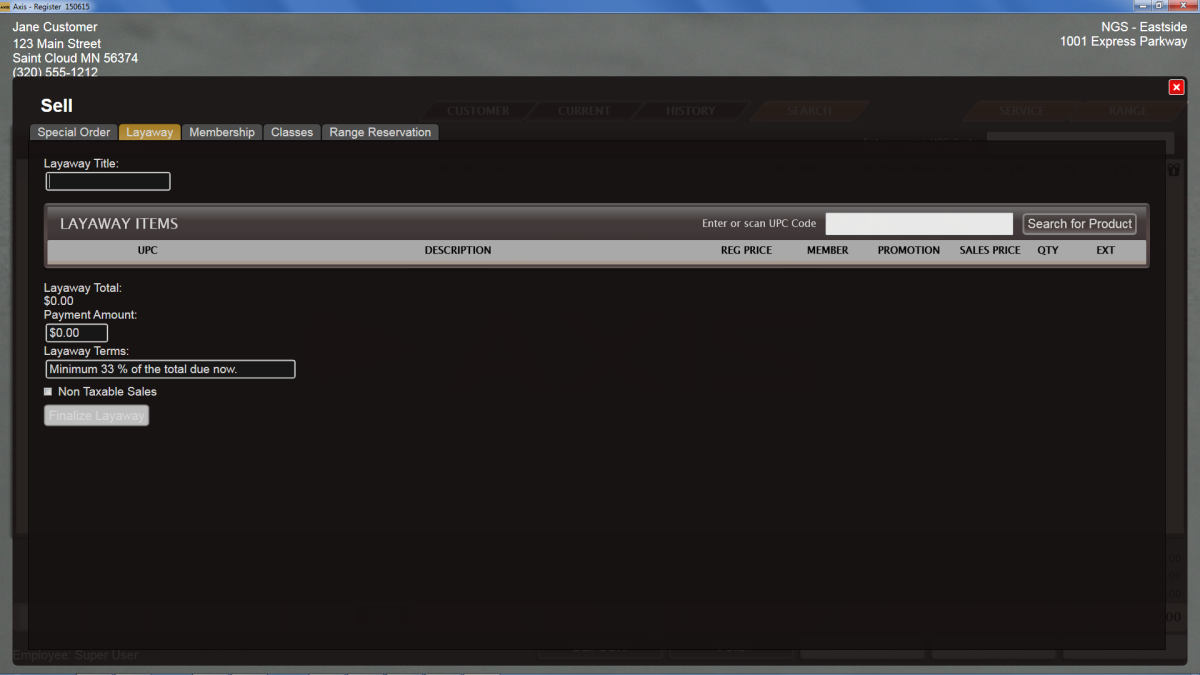
Click the Layaway tab to display the Layaway page.
-
Enter a descriptive title in the Layaway Title field.
-
Select the desired product to display it in the Layaway Items list.
- Scan or enter the product's UPC in the Enter or Scan UPC Code field and press the Enter key.
- Click the Search for Product button and search for and select the desired product.
Note: Refer to Add an Item to a Transaction for information on using product entry and search controls.
-
Edit fields as needed:
-
Modify the automatically calculated amount in the Payment Amount field.
-
Enter/edit terms in the Layaway Terms field.
-
If the transaction is tax exempt, check the Non Taxable Salescheckbox.
-
-
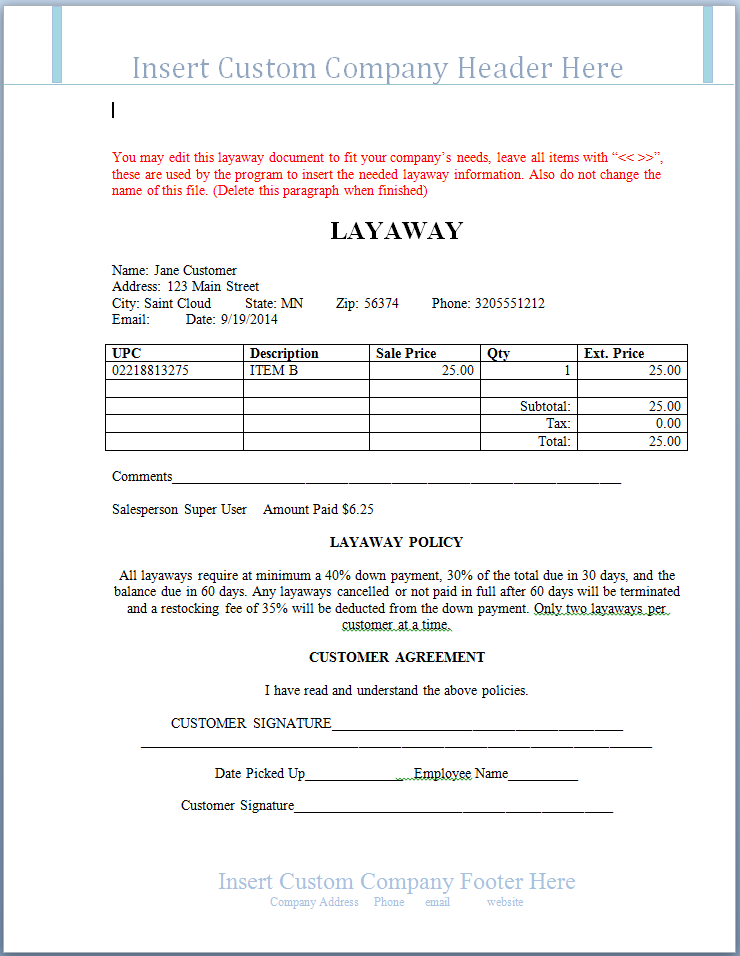
Click the Finalize Layaway button to add the item to the customer’s Layaways list on the Current window, add the initial payment amount to the Cash Register screen, and display the layaway document.
-
Save and print the document as desired to create electronic and hardcopy records of the layaway. Close the document to return to the Cash Register screen.

- Accept Payment for a Transaction to complete the initial payment transaction.
-
Complete the following when appropriate:
- Have the customer complete the 4473 form and receive authorization for it.
- Receive a Payment on a Layaway
- Move a Firearm Transaction to the Cash Register Screen
- Transfer a Firearm to a Customer from the Current Window
Place a Special Order
- Identify the Customer.
- Click the Sell tab to display the Sell window.
-
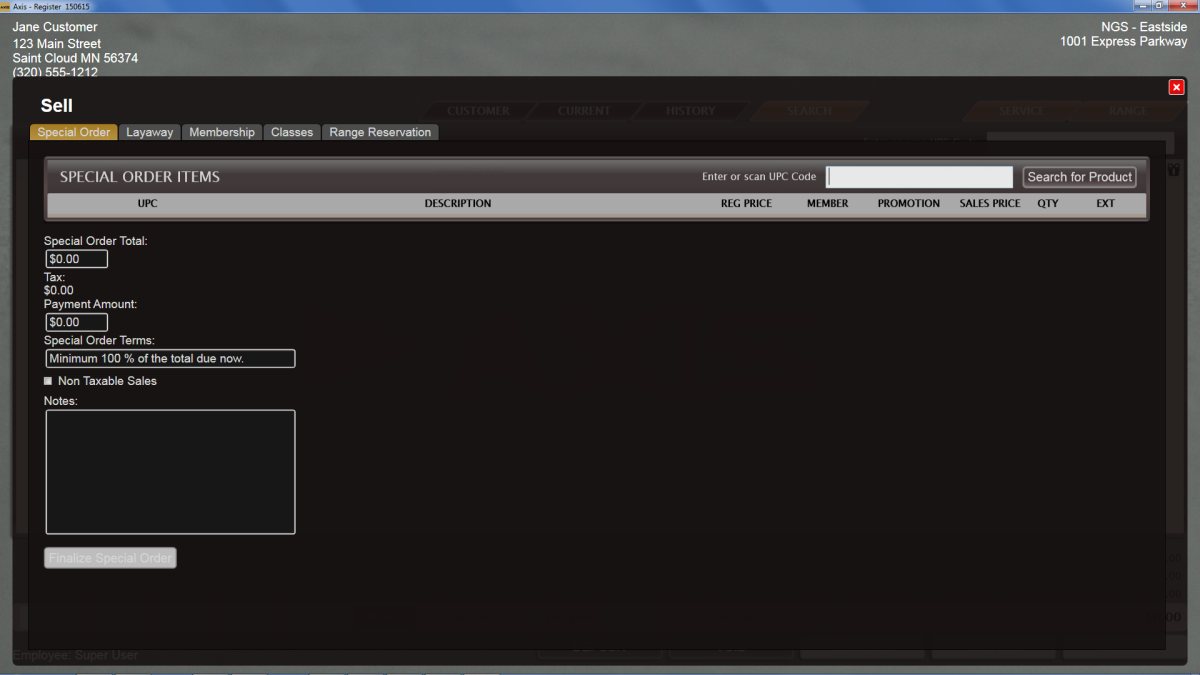
Click the Special Order tab to display the Special Order page.
-
Select the desired product to display it in the Special Order Items list.
- Scan or enter the product's UPC in the Enter or Scan UPC Code field and press the Enter key.
- Click the Search for Product button and search for and select the desired product.
Note: Refer to Add an Item to a Transaction for information on using product entry and search controls.
-
Edit fields as needed:
-
Modify the automatically calculated amount in the Payment Amount field.
-
Enter/edit terms in the Special Order Terms field.
-
If the transaction is tax exempt, check the Non Taxable Sales checkbox.
-
Enter explanatory notes in the Notes field.
-
-
Click the Finalize Special Order button to add the item to the customer’s Special Orders list on the Current window, add the deposit amount to the Cash Register screen, and display the special order document.

-
Save and print the document as desired to create electronic and hardcopy records of the special order. Close the document to return to the Cash Register screen.

- Accept Payment for a Transaction to complete the deposit payment transaction.
- Have the customer complete the 4473 form.
-
Complete the following when appropriate:
- Receive the Special Order Firearm into Inventory. (See Receive Inventory Items for more information.)
- Have the customer complete the 4473 form and receive authorization for it.
- Receive a Payment on a Special Order
- Move a Firearm Transaction to the Cash Register Screen
- Transfer a Firearm to a Customer from the Current Window
4473 type?
electronic - The Electronic 4473 Form provides a simple, interactive way for the retailer and customer to complete, process, and update the 4473 forms needed for a firearm transaction. see Oversee the Electronic 4473 Form Process
Oversee the Electronic 4473 Form Process
Complete the following procedure to manage the creation and processing of an Electronic 4473 form for a firearm transaction
- Start a 4473 Form for a Customer.
- Have the customer Fill Out the Customer Portion of an Electronic 4473 Form.
-
When the customer returns with a valid ID, Process a 4473 Form.
- If No, then NO!
- If Yes, then Print; sign, wait for and receive authorization, signature
- Update a 4473 Form Disposition.
- then send the gun to the Register - Move a Firearm Transaction to the Cash Register Screen
Document a Firearm Sale
-
 Navigate to the Firearm Sale screen.
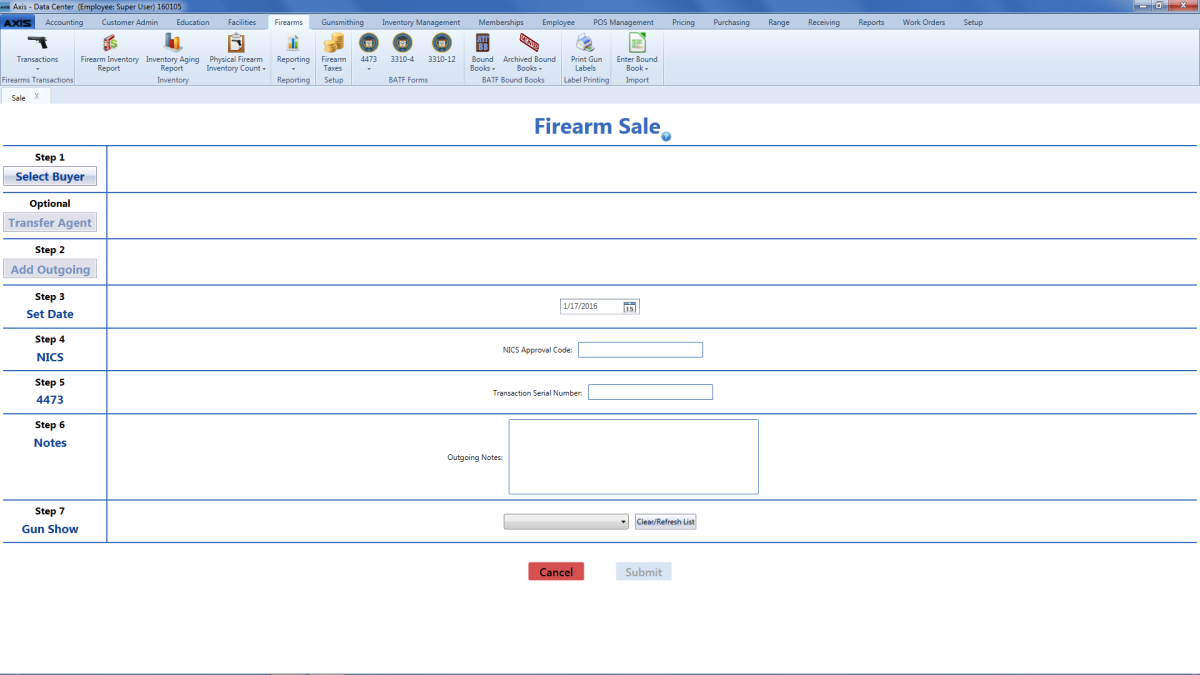
- Click the Select Buyer button to Select or Add a Customer.
- If the transaction requires a transfer agent, click the Transfer Agent button to Select a Transfer Agent.
-
Click the Add Outgoing button to Select a Firearm from the Firearm Inventory Window.
- Complete the remaining fields:
Enter the transaction date (mm/dd/yyyy) or Select a Date with the calendar button in the Set Date field.
Note: This is the date of the transaction, not the date of the disposition.
- Enter the NICS approval code in the NICS Approval Code field.
- Enter the transaction serial number in the Transaction Serial Number field.
- If needed, enter transaction notes in the Notes field.
If the transaction occurred at a gun show, select the gun show from the Gun Show drop-down field.
Note: If the gun show is not available in the drop-down, create it before completing this firearm transaction. Refer to Manage Gun Show Information for more information.
- Click the Submit button to send the transaction to the customer's Current record in the Register application for processing and payments.
-
Complete the following when appropriate:
- Receive authorization for the customer's 4473 form.
- Move a Firearm Transaction to the Cash Register Screen
- Transfer a Firearm to a Customer from the Current Window
Sell a Firearm through the Register Application
- Identify the Customer.
- Click the Search tab to display the Product Search window.
-
Click the Firearm Inventory tab to display a list of firearms.
Note: If the Firearm Inventory tab does not appear on the screen, firearms may not be sold through the Register application.
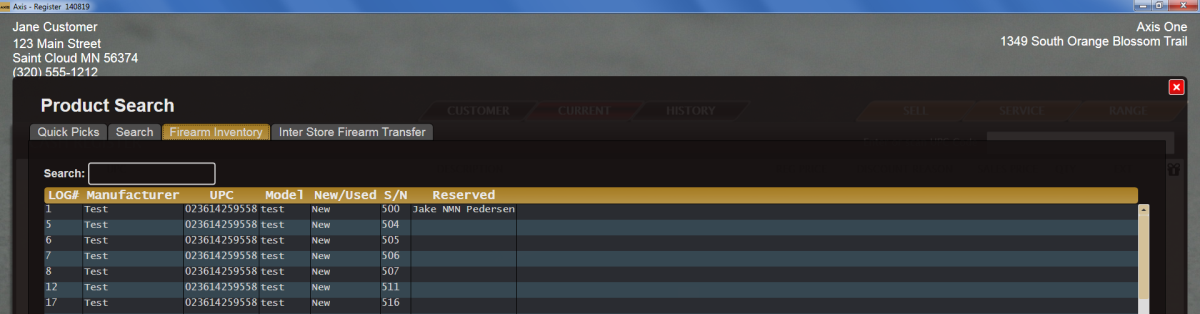
-
Double-click a firearm to display the Customer Information window.
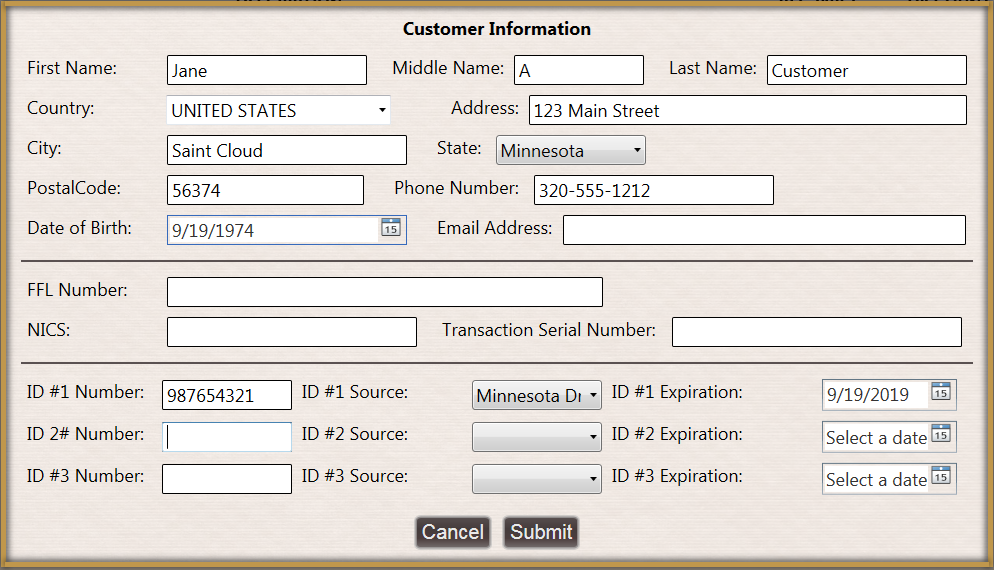
- Complete the fields as needed.
-
Click the Submit button to add the firearm transaction to the Cash Register screen.
Note: If the Waiting Period Required window appears, click the Continue button to close the window. In some cases, a manager may exclude the firearm from the waiting period. Refer to Exclude a Firearm Transaction from a Waiting Period for more information.

- Accept Payment for a Transaction.
-
Complete one of the following:
-
If no additional waiting period is required, transfer the firearm to the customer.
-
If a waiting period is required, the firearm transaction will be listed on the customer’s Current window and the firearm must be retained until the period expires. After the period expires, the firearm may be transferred to the customer. Refer to Transfer a Firearm to a Customer from the Current Window for more information.
-
Move a Firearm Transaction to the Cash Register Screen
- Identify the Customer.
-
Click the Current tab to display the Current window.
Note: If necessary, click the expand button beside the Firearm Transactions heading to display the customer’s current firearm transactions.
-
Click a firearm to display details.
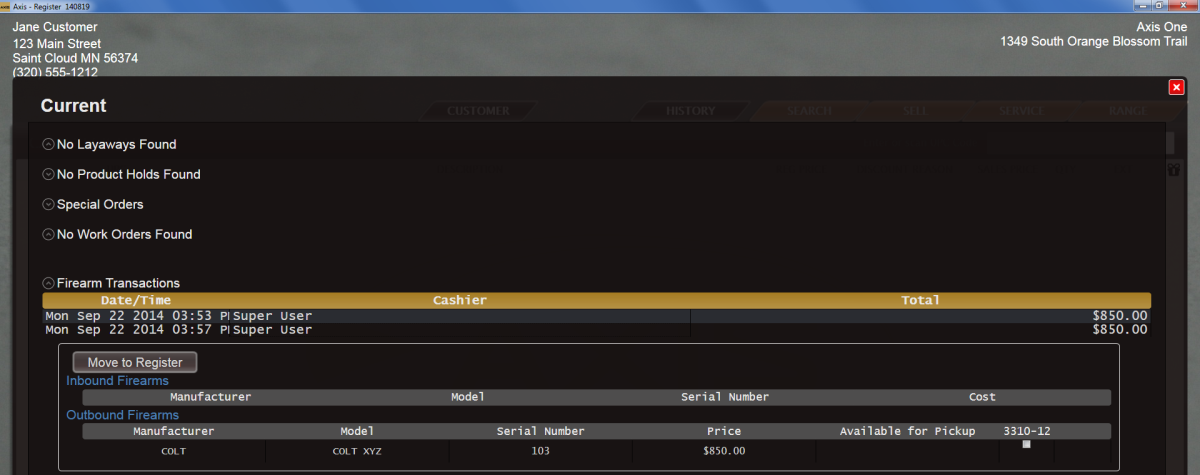
-
Locate the Move to Register button.
Note: If the Move to Register button is not present, the firearm has already been processed through the register and does not need to be moved to the Cash Register screen.
-
Click the Move to Register button to add the firearm transaction to the Cash Register screen and close the Current window.
Note: If the Waiting Period Required window appears, click the Continue button to close the window. In some cases, a manager may exclude the firearm from the waiting period. Refer to Exclude a Firearm Transaction from a Waiting Period for more information.
- Accept Payment for a Transaction.
-
Complete one of the following:
-
If no additional waiting period is required, transfer the firearm to the customer.
-
If a waiting period is required, the firearm transaction will be listed on the customer’s Current window and the firearm must be retained until the period expires. After the period expires, the firearm may be transferred to the customer. Refer to Transfer a Firearm to a Customer from the Current Window for more information.
-
Accept Payment for a Transaction. and complete one of the following:
-
If no additional waiting period is required, transfer the firearm to the customer.
-
If a waiting period is required, the firearm transaction will be listed on the customer’s Current window and the firearm must be retained until the period expires. After the period expires, the firearm may be transferred to the customer. Refer to Transfer a Firearm to a Customer from the Current Window for more information.
Transfer a Firearm to a Customer from the Current Window
- Identify the Customer.
-
Click the Current tab to display the Current window.
Note: If necessary, click the expand button beside the Firearm Transactions heading to display the customer’s current firearm transactions.
-
Click a firearm to display details.
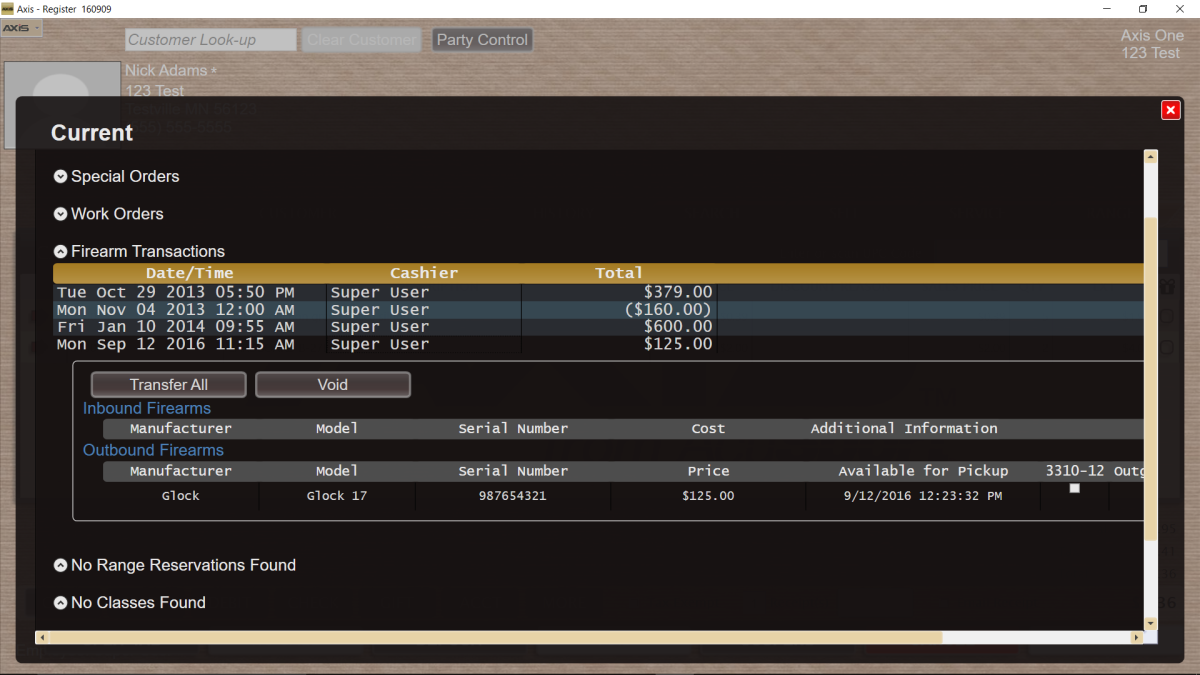
-
Locate the firearm’s Transfer button:
-
If the text on the button is white, click the Transfer button to add the firearm transaction to the Cash Register screen.
-
If the text on the button is red, the firearm is subject to a waiting period and must be retained until the period expires. After the period expires, the button text will be white and this procedure may be completed.
Note: If the red Transfer button is clicked, the system displays a Waiting Period Required window. In some cases, a manager may exclude the firearm from the waiting period. Refer to Exclude a Firearm Transaction from a Waiting Period for more information.
-
-
Complete the transaction and transfer the firearm to the customer.